Thursday, June 28, 2012

DIY Campfire Casseroles

Here in Minnesota, we're about to dive head first into summer as the temperatures reach 90+ degrees F.  That means one thing in our family:  camping season!


Growing up, both my hubby and I spent a lot of time in the summer camping.  And I don't mean with a big gorgeous motor home, or even camper
(not that I have anything against them, mind you), but usually at a state park or campground in a tent with a bonfire and sometimes a Coleman stove.  


I remember one year camping in Kentucky.  We had pitched our tent, gotten the "outdoor kitchen" all set up and things were going great when the sky suddenly darkened, thunder banged directly overhead scaring the bejesus out of all 5 of us kids, the wind came up and nearly knocked my baby sister into next week, and the rain started coming down in sheets.  It was useless to run to the tent for cover, so Mom and Dad hurried all 5 of us into our station wagon where we waited out the storm.


When it was over, the entire campground was under about 18 inches of water, our tent was completely blown down, and our little kitchen was destroyed.  We later learned that a tornado had actually gone through the park, so we were extremely lucky to have weathered the storm relatively unscathed with most of our stuff, although most of it was scattered everywhere.


That actually is a great memory for me, because even though it was pretty scary at first, we got through it as a family, and everyone in the campground helped each other rebuild their campsites.  It truly was a group effort, and it was a great thing for children to see strangers offering help to each other in a time of need.


I believe one of the greatest things ever invented for camping was the "hobo dinner."  If you've ever camped in your life, you know what I'm talking about.  Usually a hamburger patty, seasoned, with assorted veggies...potatoes, onion, carrot, etc., wrapped in foil then cooked over the fire.  They were fun, nutritious and delicious, and there have been a million different versions sparked by that first burger supper.  Potatoes with onions and bacon, AKA campfire potatoes, omelets in baggies thrown into boiling water over the campfire, you name it, it's been done.


Today, I'm going to share with you a version of that first hobo dinner, but mine's a little more hands on, and does require some advance prep on Mom's part, but the result is a wonderful supper, one that kids and adults alike will have a blast preparing.  I give to you "Southwest Style Campfire Casseroles."  Enjoy, and please let me know how yours turned out!


Southwest Style Campfire Casseroles

1 lb. lean ground beef
1 pkg. taco seasoning
Assorted fillings, such as:
     chopped onion
     chopped green pepper
     corn
     black beans or chili beans
     sliced green onion
1-2 cups shredded taco style cheese
1 can enchilada sauce
1 pkg. Jiffy corn muffin mix, prepared according to package directions.
Crushed tortilla chips
Mini Aluminum Loaf pans
Vegetable cooking spray

Directions:

First prepare ground beef with taco seasoning as directed on package.  Place ground beef in covered plastic container, such as Glad Take Alongs. Place your prepared cornbread mix in a container as well.  (You can also prepare the mix at camp, but make sure you have the milk and eggs along too)

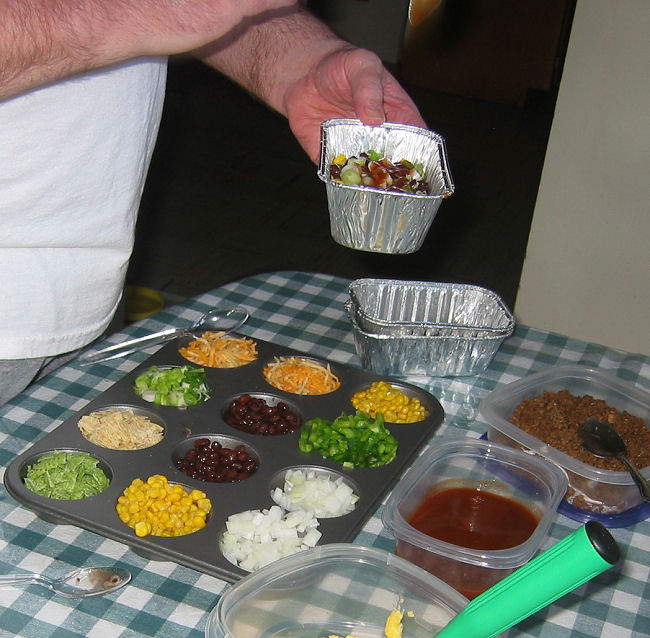
Next, and this is how I've discovered is easiest for my family, but it's purely your preference, place fillings in muffin tin, along with the cheese, as shown in the photo below.


My muffin tin has a lid with a handle, but if yours doesn't, simply cover with aluminum foil.

Now, when you're actually ready to prepare the casseroles, spray your loaf pans with cooking spray (each loaf pan will feed one adult or 2 children.  You may also choose to prepare them in aluminum muffin cups for smaller portions) Pass out the pans to each camper, and tell them to start adding ingredients, beginning with the ground beef, and finishing with crushed chips, if you have them.  I've numbered the steps in the diagram below:


You can see that the taco beef is first, then the onions, corn and beans are second, cheese is third, enchilada sauce is fourth, cornbread mix is fifth and crushed taco chips are sixth.  We used a half cup ice cream scoop for the cornbread mix and a small gravy ladle for the enchilada sauce, using one scoop of cornbread mix and 2-3 ladles of sauce, according to how moist you want them.  This should make about 4 mini loaf pans full.

Next, wrap your loaf pans in foil, leaving a little space at the top, then place them over indirect heat on your campfire or covered grill.  Watch them closely so as not to over cook them.  They should take approximately 20 - 40 minutes depending on the heat of your fire.  And that's it...have fun, and enjoy!

*Note*  You can also prepare these at home...they're great for parties or even for a fun family night.  Simply bake the mini loaf pans uncovered in a 400 degree F. oven for 20-25 minutes or until golden brown.  Below, you can see the different steps as my husband prepared his.

Adding toppings:

Adding Sauce:

Adding chips last:


Experiment with different toppings, and have fun with these!

Sunday, June 24, 2012

Chocolate Banana Shortcake

As a child, we moved around a lot, and although I was born in Minnesota and live here now, I spent many of my "growing up" years in the South.  At age eight, we moved to Louisiana, at nine, we were in San Antonio, Texas, and that same year, we moved yet again to Dallas, Texas, then once more to Waynesville (Ft. Leonardwood), Missouri.


When I was ten, my parents made the decision that my Dad would spend a year in Viet Nam working for AAFES  (Army and Air Force Exchange Service), so we moved back to Minnesota for that year. When he returned home, we were transferred to Ft. Gordon in Augusta, Georgia, where we stayed until I was fourteen.  We then moved to Bowling Green, Kentucky for a year, and then finally Dad took a job at Opryland USA in Nashville, Tennessee.

Those years in Tennessee are some of the most memorable of my life.  Friendships were formed, I graduated high school there, went to college there, had my first job there, my first boyfriend, and my first apartment.   Mom and Dad were finally meeting new people as well, some of whom have remained lifelong friends.  

One couple in particular were Buddy and Reba, who became like second parents to us kids, and best friends to Mom and Dad. God rest their souls, we lost them both last year within a few months of each other.

Buddy was an OTR truck driver and Reba was a recent divorcée when they met and fell in love at the American Legion.  They were married, and between them had 8 children. Although not a clone of the Brady Bunch, their family dynamic worked.

Reba came from an upper middle class family and never had to learn to cook, so the cooking skills she brought to the marriage were, um, limited, to say the least.  But she jumped right in, and to her credit, she became a pretty decent cook in her own right.  She made the absolute most awesome biscuits you ever ate...they literally melted in your mouth.  One day we were over for brunch after church and Reba had the traditional biscuits and sausage gravy, but she had also made "Chocolate Gravy"!

I'm like, what the heck is chocolate gravy...I'd never heard of, let alone tasted a delicacy such as this!  Turns out, it's a very Southern dish (usually served over biscuits) that I can only describe as a cross between chocolate pudding and chocolate syrup...either way it's heaven in your mouth!

Anyway, the other night, I was trying to figure out what to do with some leftover shortcake I'd made the night before for Strawberry Shortcake.  I'm thinking, "what the heck can I make that's sweet to go over that darn shortcake?"  

And then it hit me...Reba's Chocolate Gravy!  Well, I didn't have her recipe, so I went in search of one in my vast array of cookbooks, to no avail.  Then I turned to the internet and came up with several that I thought sounded close to Reba's.  Well, I make the gravy, tried it, and I'm not so impressed.  It needed something.  So I added cinnamon and strong coffee and tried it again. Still not there.  Then I spied the bunch of bananas on the counter and it hit me.  Chocolate. Banana. Shortcake. Ding, ding, ding, ding...it was to DIE for!  The real deal. Truly a most incredible dish worthy of the gods, people!  So without further ado, I give you Chocolate Banana Shortcake!


Chocolate Banana Shortcake

For the shortcake:

Recipe adapted from here.


3 cups flour

5 tsp. baking powder

1-1/4 tsp. kosher salt
1/4 cup sugar
3 Tbs. butter
3 Tbs. shortening
1-1/2 cups half and half
2 tsp. vanilla
Melted butter to brush shortcakes
Sanding sugar for dusting


Directions

Heat oven 450 degrees.
In a large mixing bowl, combine flour, baking powder, salt and sugar. Cut in butter and shortening. Mix in half-and-half and vanilla. Drop by large spoonfuls onto a baking sheet. Brush with melted butter and sprinkle with sugar. Bake for 15 minutes or until brown. Cool and set aside.

For the Chocolate Gravy:
Recipe adapted from
here.

  • 1/2 stick butter
  • 2/3 cup granulated sugar
  • 1/3 cup brown sugar
  • 2 tablespoons all-purpose flour
  • 1/4 cup cocoa
  • 1 tsp. cinnamon
  • 1 cup whole milk
  • 1/2 cup half and half
  • 1/2 cup cold strong coffee
  • 2 tsp. vanilla
Directions:
Heat butter in a cast iron skillet over low heat. Mix in sugar, brown sugar, flour, cocoa and cinnamon. Slowly pour 1 cup of milk into the skillet and whisk well to remove lumps. Whisk in half and half and coffee, stirring constantly, until mixture is thick, being careful not to scorch. Remove from heat and add vanilla.  Set aside.

6 bananas, cut in half, then cut in half again lengthwise
1 - 8 oz. tub whipped topping, or 1 cup sweetened whipped cream.

Assembly:

Cut shortcakes in half and place on serving plate. Place 2 cut banana halves on each shortcake.  Ladle 1/2 cup chocolate grave over bananas and top with dollop whipped topping or whipped cream.  Serve immediately. Serves 12.


Hello, and Welcome to RetroGrannie Cooks!


Wow, my first blog post, and I'm as nervous as a wh... er, as a cat on a hot tin roof! Please bear with me as I muddle through the ins and outs of being a food blogger. If I make any mistakes, or you have any suggestions for me, please don't hesitate to email me, and let me know. But, please, play nice. If you can't say something nice (to me or other visitors), then don't say anything at all. Constructive criticism, however, is always welcome, but please email me with it.


OK, now that that's out of the way, let me introduce myself.  My name is René, or RetroGrannie, as I'm known in the food world. I'm actually not a Grannie, rather the term refers to my age...umm, nope, I'm not tellin ya!  :)  I live with my husband, the Magnificent Mr. T.  No, not THAT Mr. T, LOL, just my loving term for my loving hubby. (Yup, I'm totally suckin' up here!) 


We live in North Central Minnesota with Cookie the Cat and are surrounded by cousins, aunts and uncles. We spoil our nieces and nephews rotten when we see them, which isn't very often, because they are scattered all over the U.S. 


The Retro refers to the fact that I adore anything retro, vintage or antique. I'm a rummage sale fiend, and love to collect old kitchenware, utensils and the like. I love to cook and bake, and share the goods with family and friends. I don't always have success with what I happen to be making on any given day, but you can be sure that it's always made with love.


Here, I will share some of those successes and hope you get as much pleasure out of making and eating them as I do.  I'll be posting the first recipe real soon, so y'all come back now, y'hear?! (Sorry, my years living in the South just had to make an appearance)!